Whilst browsing in The Range I came across a wallpaper pattern that immediately recommended itself for use in a scratch build. It has a rather lovely pattern of stonework across it. Whether this will still come through after painting it, I am not sure. So instead of being sensible and testing a patch first I'm going to jump in a make a building and keep my fingers crossed.
Prior to the last encounter in the 29 Let's Go Campaign I was perusing the map for game two, to make sure I had everything I needed to create a serviceable layout. I'm sure I could but there is an L-shaped building that I don't have anything similar to. Not really a big deal but as I want to make something anyway I may as well try this!
With a bit of finger in the air and heel stamping on ground, I've come up with a rough layout size and design, and cut some walls from cork to suit. The cork comes from a pack of place-mats I purchased when lost in IKEA. I have now realised there is a shortcut and you don't have to wander aimlessly through every bloody bit of it to get out of the infernal Swedish maze. Anyway.

With the cork cut out I make my first mistake. To some walls I started to add lintels and ledges (by gluing cut up coffee stirrers on), until I realised that actually gluing the wallpaper on first, then the lintels etc would be much simpler.

After much wailing and gnashing of teeth I was suitably humbled and ready to proceed.
 The wallpaper was easily cut out and to size for the latter walls, but the former required a bit of finangling to get fitted. Once the pieces had dried they could then be assembled and glued into position.
 And here we have mistake number two. I now have a gap running down the wall where two butt up together. Probably should have added the paper after gluing it all together. To fix it I simply beveled the edges slightly to allow them to fit together rather than just butt one up against the other. Not perfect but with a bit of filler I'm hoping it will pass muster.

I've also added some supports to hold up the first floor to the inside, just small bits of foam cut out and glued into position. The small roof section is from a foam platter that you sometimes get in supermarket pizza boxes. The pattern looks a bit tile-like so I'll see how it looks fully painted up and if it gives a decent impression of being a roof then it stays, if not I'll add card roof tiles to jazz it up! In the above photo it has been painted in grey and I think is looking alright.

The main roof is made of the same stuff and with a black base coat, followed by some grey dry brushing I think it looks alright. I've also added some kebab skewers onto the corners, firstly to hide the dodgy joins or rather gaps in the wall paper but also to add detail!

Here I shamelessly stole the idea from Hendrik on the TFL Forum and his Chateau build to add some growing stuff up the side, again to mask some gaps.

Here it is almost done, green bits added, shutters painted but I still need to give them a highlight to bring them out. I also tried adding a bit of blue wash to the smaller roof to break up some of the uniformity and I don't think it worked! I need to water it down a lot more so it is just a tinge and not a great big blue splodge. Ah well, you live and learn.
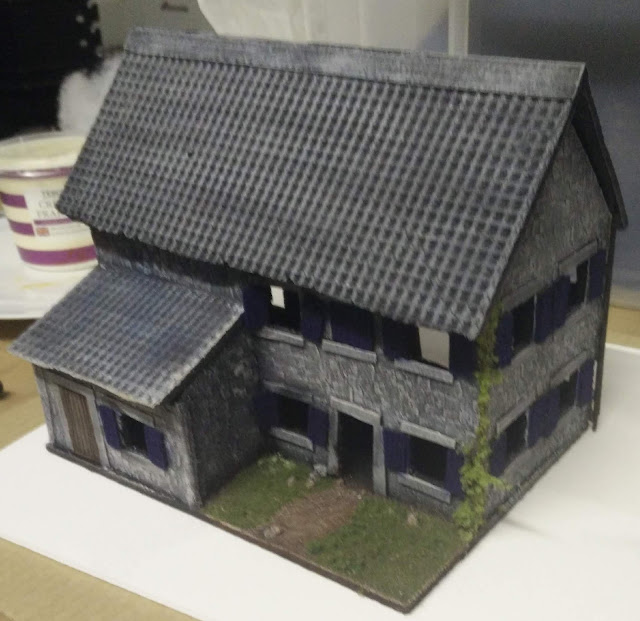
For a cheap wee cork, wall paper and pizza foam build I'm rather satisfied with the result (touch up work not withstanding). I would probably put fewer windows in next time I make something, I think they take up too much space. Thoughts and comments welcome!
Prior to the last encounter in the 29 Let's Go Campaign I was perusing the map for game two, to make sure I had everything I needed to create a serviceable layout. I'm sure I could but there is an L-shaped building that I don't have anything similar to. Not really a big deal but as I want to make something anyway I may as well try this!
With a bit of finger in the air and heel stamping on ground, I've come up with a rough layout size and design, and cut some walls from cork to suit. The cork comes from a pack of place-mats I purchased when lost in IKEA. I have now realised there is a shortcut and you don't have to wander aimlessly through every bloody bit of it to get out of the infernal Swedish maze. Anyway.

With the cork cut out I make my first mistake. To some walls I started to add lintels and ledges (by gluing cut up coffee stirrers on), until I realised that actually gluing the wallpaper on first, then the lintels etc would be much simpler.

After much wailing and gnashing of teeth I was suitably humbled and ready to proceed.
 The wallpaper was easily cut out and to size for the latter walls, but the former required a bit of finangling to get fitted. Once the pieces had dried they could then be assembled and glued into position.
 And here we have mistake number two. I now have a gap running down the wall where two butt up together. Probably should have added the paper after gluing it all together. To fix it I simply beveled the edges slightly to allow them to fit together rather than just butt one up against the other. Not perfect but with a bit of filler I'm hoping it will pass muster.
I've also added some supports to hold up the first floor to the inside, just small bits of foam cut out and glued into position. The small roof section is from a foam platter that you sometimes get in supermarket pizza boxes. The pattern looks a bit tile-like so I'll see how it looks fully painted up and if it gives a decent impression of being a roof then it stays, if not I'll add card roof tiles to jazz it up! In the above photo it has been painted in grey and I think is looking alright.

The main roof is made of the same stuff and with a black base coat, followed by some grey dry brushing I think it looks alright. I've also added some kebab skewers onto the corners, firstly to hide the dodgy joins or rather gaps in the wall paper but also to add detail!

Here I shamelessly stole the idea from Hendrik on the TFL Forum and his Chateau build to add some growing stuff up the side, again to mask some gaps.

Here it is almost done, green bits added, shutters painted but I still need to give them a highlight to bring them out. I also tried adding a bit of blue wash to the smaller roof to break up some of the uniformity and I don't think it worked! I need to water it down a lot more so it is just a tinge and not a great big blue splodge. Ah well, you live and learn.

For a cheap wee cork, wall paper and pizza foam build I'm rather satisfied with the result (touch up work not withstanding). I would probably put fewer windows in next time I make something, I think they take up too much space. Thoughts and comments welcome!
No comments:
Post a Comment