Right, after feeling rather pleased with myself over the last scratch build for the 29 Let's Go Campaign I decided to try my hand at it again. This time it is a church for scenario 3. I was planning on buying either an MDF kit or picking up a cheap plastic railroad one and just doing a bit of decoration but I have a fair bit of materials to use and I rather enjoyed the last build so why not?!
I googled the church and got an idea of it's shape and formation, again not to build an exact replica as I just do not possess the skills to do that, but to make a serviceable model that could be used in a variety of settings. Or so goes my thinking.


With some eye squinting and guesstimation based on the scenario map I come up with a size of 10x8in for this build. I marked it out roughly on a piece of hardboard and coated the reverse side in a good coat of paint. Some helpful TFL forum members suggested this as a solution to potential warping and from some other small bits I've done in the interim I would say it works a treat.

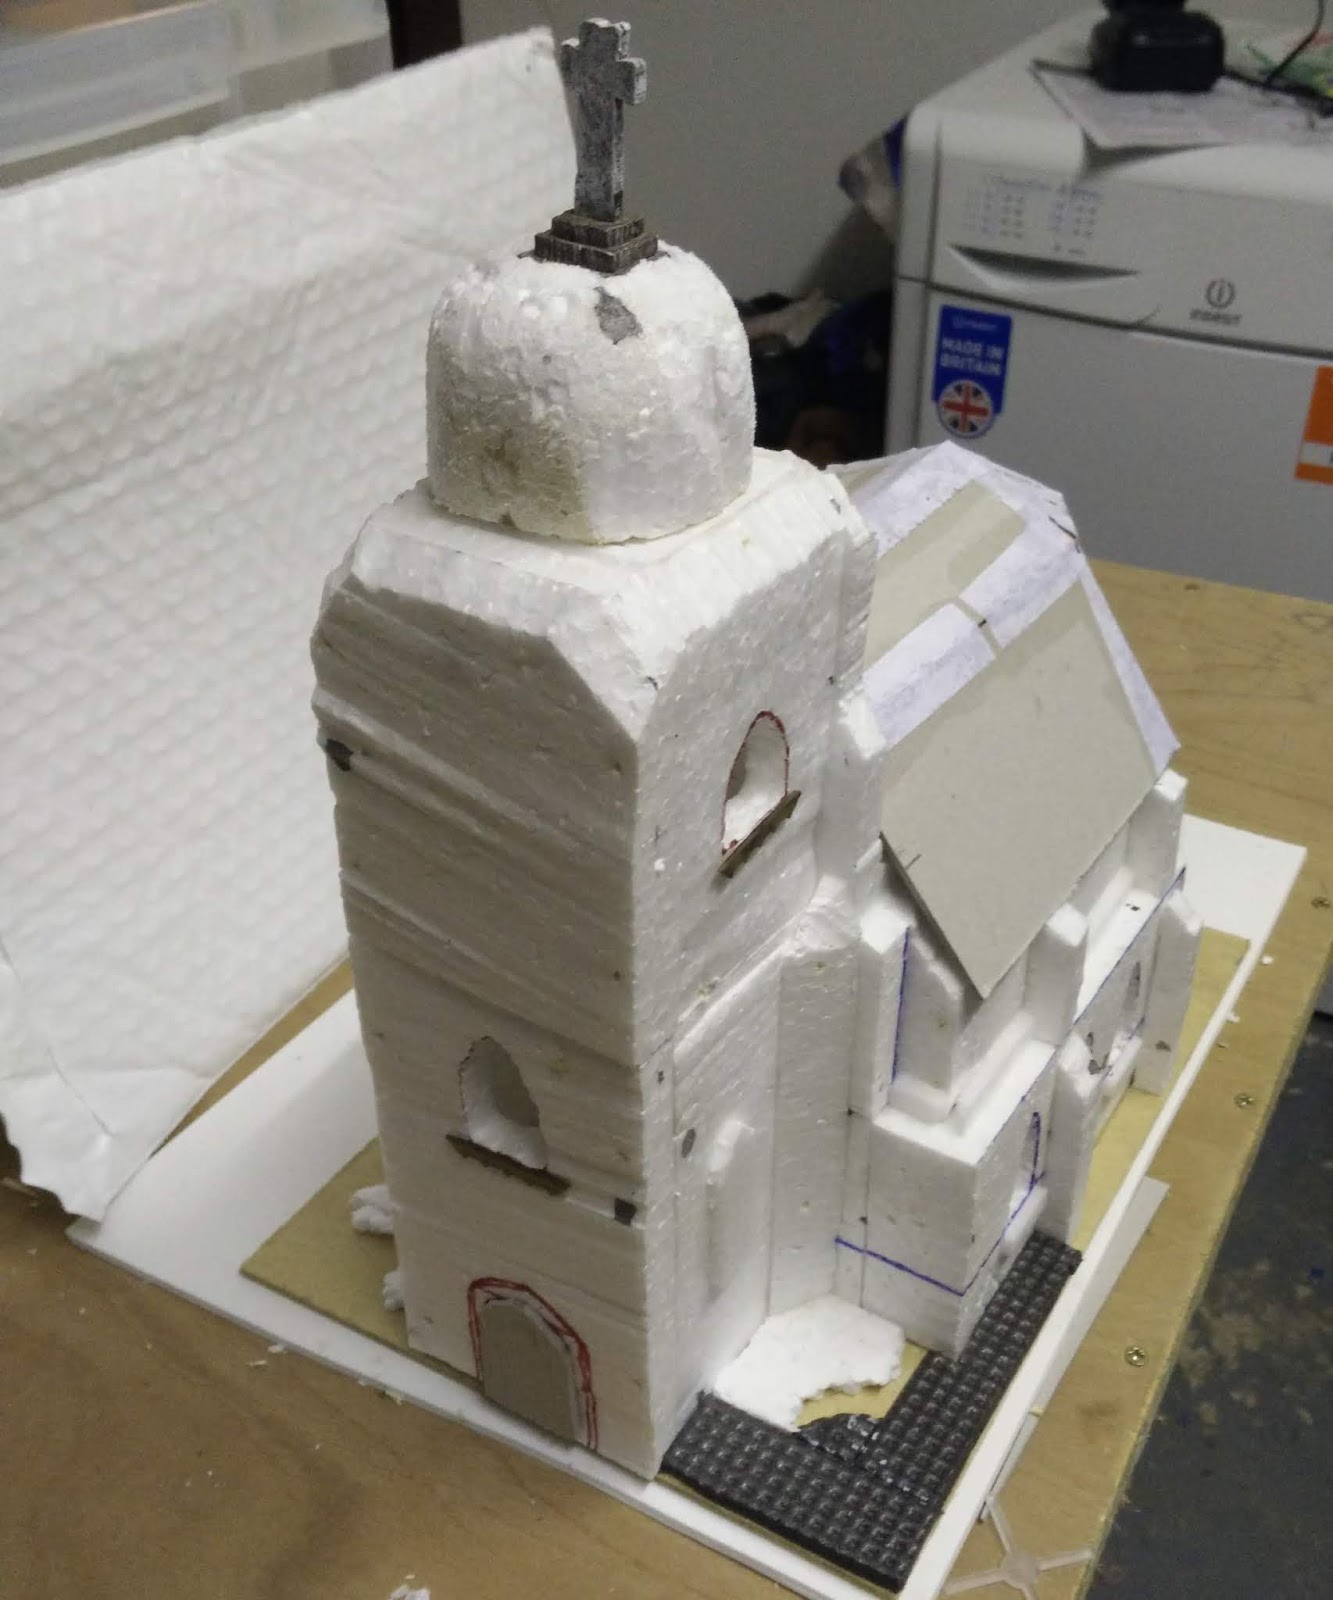
For a bit of variety (and to start learning about different materials) I am using polystyrene foam to make this. This is the cheaper expanded polystyrene rather than the denser extruded variety. The basic structure is made out of the foam by cutting slices off to create the walls and gluing them in place with some PVA and cocktail sticks to hold the sections together.


The main structure is finished off and then the roof is tackled. The sub-structure is from foam, carved to the basic shape and then with card panels glued into position. I glue paper over the seams of the card to give a smoother appearance. The top cross is actually a piece from Supreme littleness designs which I got a while back, thrown in for free when buying a selection of patrol markers from them.

Although at this stage I realised that it really needs another window in the front of the tower, up at the top. It just doesn't look right blank.

The whole thing is coated in black emulsion. This is partly to seal the foam but I think it will also help the next stage.

The next stage is of course smearing plaster (mixed/thinned slightly with PVA) everywhere. In some areas I tried to texture it a bit using a bit of soft packing foam, however I didn't get as much done as I would have liked as I got called away onto something else and it largely dried by the time I got back to it! The dangers of a hobbyist.


In one corner I've added a bit of cobblestone, just etched foam, to add some detail and difference. The windows are not even, largely because I free-handed them, but it has made me think it would be useful to make a small jib/stencil that I could use as a template. I'll try even up the windows a little but I'm not going to spend too much time on it.

Once dried the whole thing got a good coat of a dark grey. This was followed by a range of other colours (yellow ochre, beige, sandstone, fresh barley) mainly tester pots, to try get a sandstone like finish. Strangely enough Sandstone is not quite sandstoney enough for my liking.


At this point I don't think it is too far away from the look I was aiming for. I think it needs a little more grey dry brushed on in some places, and probably a wash to tie it all together and weather it a little. And of course the roof to be finished.
It is pretty shoddy construction work, not flush, not at right angles but it has been thrown together quickly and it has given me some good ideas for the future in how to go about making some buildings out of foam. I also am running hard with Rich Clarke's philosophy of pieces not needing to be exact scale models but rather give the impression of the environment or building. That gives me suitable leeway to be as cackhanded as I am!
You can see the end of this build here.
I googled the church and got an idea of it's shape and formation, again not to build an exact replica as I just do not possess the skills to do that, but to make a serviceable model that could be used in a variety of settings. Or so goes my thinking.


With some eye squinting and guesstimation based on the scenario map I come up with a size of 10x8in for this build. I marked it out roughly on a piece of hardboard and coated the reverse side in a good coat of paint. Some helpful TFL forum members suggested this as a solution to potential warping and from some other small bits I've done in the interim I would say it works a treat.

For a bit of variety (and to start learning about different materials) I am using polystyrene foam to make this. This is the cheaper expanded polystyrene rather than the denser extruded variety. The basic structure is made out of the foam by cutting slices off to create the walls and gluing them in place with some PVA and cocktail sticks to hold the sections together.


The main structure is finished off and then the roof is tackled. The sub-structure is from foam, carved to the basic shape and then with card panels glued into position. I glue paper over the seams of the card to give a smoother appearance. The top cross is actually a piece from Supreme littleness designs which I got a while back, thrown in for free when buying a selection of patrol markers from them.
Although at this stage I realised that it really needs another window in the front of the tower, up at the top. It just doesn't look right blank.

The whole thing is coated in black emulsion. This is partly to seal the foam but I think it will also help the next stage.

The next stage is of course smearing plaster (mixed/thinned slightly with PVA) everywhere. In some areas I tried to texture it a bit using a bit of soft packing foam, however I didn't get as much done as I would have liked as I got called away onto something else and it largely dried by the time I got back to it! The dangers of a hobbyist.


In one corner I've added a bit of cobblestone, just etched foam, to add some detail and difference. The windows are not even, largely because I free-handed them, but it has made me think it would be useful to make a small jib/stencil that I could use as a template. I'll try even up the windows a little but I'm not going to spend too much time on it.

Once dried the whole thing got a good coat of a dark grey. This was followed by a range of other colours (yellow ochre, beige, sandstone, fresh barley) mainly tester pots, to try get a sandstone like finish. Strangely enough Sandstone is not quite sandstoney enough for my liking.


At this point I don't think it is too far away from the look I was aiming for. I think it needs a little more grey dry brushed on in some places, and probably a wash to tie it all together and weather it a little. And of course the roof to be finished.
It is pretty shoddy construction work, not flush, not at right angles but it has been thrown together quickly and it has given me some good ideas for the future in how to go about making some buildings out of foam. I also am running hard with Rich Clarke's philosophy of pieces not needing to be exact scale models but rather give the impression of the environment or building. That gives me suitable leeway to be as cackhanded as I am!
You can see the end of this build here.