Thursday 13 December 2018

Going to the chapel (1)

Right, after feeling rather pleased with myself over the last scratch build for the 29 Let's Go Campaign I decided to try my hand at it again. This time it is a church for scenario 3. I was planning on buying either an MDF kit or picking up a cheap plastic railroad one and just doing a bit of decoration but I have a fair bit of materials to use and I rather enjoyed the last build so why not?!

I googled the church and got an idea of it's shape and formation, again not to build an exact replica as I just do not possess the skills to do that, but to make a serviceable model that could be used in a variety of settings. Or so goes my thinking.


With some eye squinting and guesstimation based on the scenario map I come up with a size of 10x8in for this build. I marked it out roughly on a piece of hardboard and coated the reverse side in a good coat of paint. Some helpful TFL forum members suggested this as a solution to potential warping and from some other small bits I've done in the interim I would say it works a treat.


For a bit of variety (and to start learning about different materials) I am using polystyrene foam to make this. This is the cheaper expanded polystyrene rather than the denser extruded variety. The basic structure is made out of the foam by cutting slices off to create the walls and gluing them in place with some PVA and cocktail sticks to hold the sections together.


The main structure is finished off and then the roof is tackled. The sub-structure is from foam, carved to the basic shape and then with card panels glued into position. I glue paper over the seams of the card to give a smoother appearance. The top cross is actually a piece from Supreme littleness designs which I got a while back, thrown in for free when buying a selection of patrol markers from them.


Although at this stage I realised that it really needs another window in the front of the tower, up at the top. It just doesn't look right blank.


The whole thing is coated in black emulsion. This is partly to seal the foam but I think it will also help the next stage.


The next stage is of course smearing plaster (mixed/thinned slightly with PVA) everywhere. In some areas I tried to texture it a bit using a bit of soft packing foam, however I didn't get as much done as I would have liked as I got called away onto something else and it largely dried by the time I got back to it! The dangers of a hobbyist.


 In one corner I've added a bit of cobblestone, just etched foam, to add some detail and difference. The windows are not even, largely because I free-handed them, but it has made me think it would be useful to make a small jib/stencil that I could use as a template. I'll try even up the windows a little but I'm not going to spend too much time on it.


Once dried the whole thing got a good coat of a dark grey. This was followed by a range of other colours (yellow ochre, beige, sandstone, fresh barley) mainly tester pots, to try get a sandstone like finish. Strangely enough Sandstone is not quite sandstoney enough for my liking.


At this point I don't think it is too far away from the look I was aiming for. I think it needs a little more grey dry brushed on in some places, and probably a wash to tie it all together and weather it a little. And of course the roof to be finished.

It is pretty shoddy construction work, not flush, not at right angles but it has been thrown together quickly and it has given me some good ideas for the future in how to go about making some buildings out of foam. I also am running hard with Rich Clarke's philosophy of pieces not needing to be exact scale models but rather give the impression of the environment or building. That gives me suitable leeway to be as cackhanded as I am!

You can see the end of this build here.

Tuesday 30 October 2018

29 Let's Go - Game 3 - Probe at La Cambe

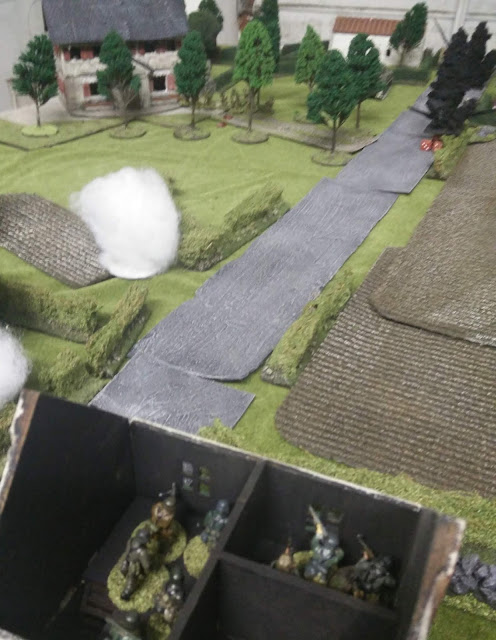
With nothing else organised this past weekend I seized the opportunity to run Game 3 of our 29 Let's Go campaign. It was the US troop's third crack at La Cambe, and this time my opponent Mike had read the rules for himself, rather than relying on me to try navigate our way through. This makes a huge difference as between the two of us we were more likely to pick up on any errors or inconsistencies we made! Right, on to the game, I tried to take notes and managed for the most part but as I went over them I noticed a number of areas where I hadn't logged what happened, even though I knew it had happened! Oh well. Hopefully I'll improve on that front. Tried to get pictures throughout but it varied depending on me remembering to take them. The game was at mine so it had hedges unlike last time, I was pretty happy with the set up although still lots of room for improvement. I have to agree with what others have said before, it really helps the immersion in the game. Enough rambling, on to the action.

We both rolled poorly for Force Morale and both started off on 8. Mike (29th Infantry Division, US) rolled for 3 extra patrol moves which he used to get his markers stacked up 12in up the road. We ended up with an average spread across the table and the JOPs were not too far from the placement last game.
The table setup and final locations of the patrol markers

German JOP's circled in Red.

US JOP's circled in blue.

Initiative is with the US troops so Mike rolled first:

US (53332)
On comes a Sherman and promptly fires a round at the boulangerie in the hopes of denying it as cover to the German troops. They’ve come with intent this time! A single six means the house is unaffected. The hull gunner is set on Overwatch and a second Sherman appears and the JL promptly sets both of his gunners on Overwatch. One squad deploys behind the hedge line south of the road, and a second behind the Maison du pays in the north.

Ger (55532)
No actions from the Germans yet, but a rather healthy push towards a third CoC die.

US (65321)
The US FOO comes on and check for availability. The first Sherman drives at full speed (3D6) to  get behind the house and start to build up a fire base to the south of the road, a roll of 8 gets him fully behind the building. The squad behind the Maison du Pays moves tactically to start creeping round the house, a bit of nervousness means they only shuffle along (rolled a 1) a bit cautious about any germans appearing it seems!

Sherman moves to take a position on the US left flank

2nd Squad starts to move forward on the right flank
Ger (66543)
A double phase but not much point in bringing anything on with a sherman on overwatch and two squads in decent cover. Still the 5 is nice!
(66653)
Ah, almost a full CoC die but the single 3 means there is no point bringing anything on. It would be too isolated I think so I hold off. Clearing the overwatch and tactical is nice though!
(53321)
3 full CoC dice. I could potentially do something here, but again there aren’t any obvious targets that I can really rip into and if I show my hand too early it gives my opponent the chance to cause more casualties, something I can’t really afford to do. With the 1 I bring on my FOO and get the mortar battery ready to fire…..
The German FOO deploys in a sneaky underhanded manner
US (62211)
The US FOO brings in a ranging shot which deviates 7in away, to the northwest (German side). A 50 cal deploys in front of the small house south of the road and the platoon sergeant, Ernest Cook, joins it, careful to place himself between the HMG and the squad lining the hedge, and sets the HMG on Overwatch.
American ranging shot fires long.
Ger (66651)
What is going on? Last game I rolled maybe one double, this time I’ve already rolled two turn ends and a double phase. The FOO calls in a ranging shot which deviates south, just about half a barrage would be on the table if it was called in. That is my fourth CoC die started.
(55211)
Ticking up the pips on the fourth CoC die. The FOO brings in the barrage, it catches the squad by the hedgeline with absolutely no effect but narrowly misses the HMG. While it has no effect on the infantry a rather lucky round hits the top of the Sherman and panics the crew causing them to reverse into the wall behind them. (He got a point of shock and a hit (one net hit table) which resulted in 2 extra shock and a reverse of 2D6). A tripod MMG deploys in an entrenchment and fires on the HMG, causing 1 shock.
The Sherman gets hit by a mortar round
and has to reverse which brings him out of range of the barrage but sitting with 3 shock

US (65542)
The US Sgt gets the HMG to return fire, which results in a kill and 2 shock. The final US squad deploys into the top floor of the maison du pays and fires at the German MMG adding a shock.

Ger (52111)
The German FOO brings down the barrage again, adjusting it to the north to try and get the HMG under it.

US (66553)
A double phase but not many options available! The JL in the Sherman removes 2 shock and is counting his lucky stars that he reversed out of the range of the barrage! The fives mean the US have now got a CoC die of their own.
(55311)
The squad in the Maison puts down covering fire across the German front (covering the house and MMG) and the squad out the front edges forward and throws some fire down at the MMG, 2 kills and a shock results in the German MMG breaking and running off the table. German morale drops to 7.

Ger (55311)
This is not going precisely to plan but the barrage is keeping half of the US front pinned and out of action which means it is probably worth holding on for now to see if the US morale can be forced down. The FOO activates the barrage again killing one and causing 1 shock on both rifle and BAR team. I don’t want to bring anything else on with the threat of the US barrage over the Orchard.

US (65531)
The FOO brings the barrage down and the Sherman moves further away from the barrage which looks like it might want to creep over him again.
The American barrage lands in the orchard.
The lucky sherman moves to support the right flank
Ger (66542)
The redubtable Otto Weinstein deploys and asks the FOO to keep stonking the US infantry. It has no effect. With 4 CoC dice I use one to end the turn and another to keep my barrage firing.
(66421)
The panzershrek team deploys to the south of the Boulangerie and fires a speculative round off at the Sherman but it misses. Otto gets the FOO to activate the barrage to more effect this time, kills a BAR team member and puts shock on each of the three teams under it.
(65553) -  A squad deploys into the upstairs of the Boulangerie and fires onto the US squad out the front of the Maison killing one and causing 2 shock.
The first German squad deploys and throws down MG42 fire at the US squad trying to advance
US (65521)
The US FOO checks availability and gets them immediately. The squad moves tactically and shuffles along an inch.

Ger (65442)
The German squad fire on the US squad in front of the Maison but to no effect. Clearly too busy looking for bread. Otto gets the FOO to fire again, resulting in 2 shock on the HMG, and gets the panzershrek team to have another go at the Sherman. A hit (double 6’s) and the resulting damage roll scores 6 hits, of which only two are saved. The plucky panzershrek team rack up their second Sherman kill of the campaign! US FM drops to 7 too.
After first missing a shot the panzershrek then hits on a double 6.
The Sherman gets KO'd. Two rings on the panzershrek barrel!
US (55511)
The rifle team of the squad out the front moves, pushing to the front of the section. The US deploy a 60mm mortar which fires off a round at the panzershrek team. No effect.

Ger (63221)
The barrage inflicts 2 more shock on the HMG which is starting to look wobbly, the US Sgt being the only thing keeping them functioning. More fire is attempted at the US squad trying to advance but yet again the Germans are too busy with munching on bread to aim properly.

US (43221)
A lot more useful for the US player – so many available options and combinations. The FOO brings down the barrage a second time, the Sgt rallies shock off the HMG and BAR team. The platoon commander Lt Elmer Turner deploys into the top floor of the maison to provide some guidance to the FOO and keep the squad laying down covering fire onto the German frontage. He shouts out the window to get the squad out the front moving forwards again.

Ger (52211)
The barrage continues killing a rifleman and putting a point of shock on them. The squad upstairs fires again but with the covering fire from the US they don’t manage any hits!

US (52111)
More covering fire is thrown at the germans and the other squad keeps moving with a mad dash to get behind the cover of the barrage (8in on 3D6 taking some more shock in the rush!)

Ger (65421)
More barrage with one kill to the rifle team but no other effect. For the length of time the barrage has been on it hasn’t done a huge amount of actual damage but tactically it has locked down the US attack which has been invaluable. The squad tries to fire on the 60mm mortar but can’t get the hits to stick, the covering fire is very effective and any stray 6’s are not getting converted into anything useful!

US (65341)
Sgt Cook manages the shock on the HMG and BAR again, the JL does the same with the rifles, and the mortar fires off another round at the panzershrek but gets nothing.

Ger (54431)
Obergefreiter Wienstein tries to get the FOO to hit something with the barrage but the US teams have clearly taken great cover as the shells whistle harmlessly around them. The squad fires on the mortar and hits them for three shock. Huzzah!

US (55421)
US are getting CoC points but would rather be getting troops activated! The squad that ran forward get themselves organised and remove some shock. Lt Turner yells out the window to get the 60mm to take cover behind the maison walls, the team need no further encouragement and scramble over the hedge and into the cover of the walls.
With the squad in the open removing shock I decide it is time to end the US barrage by ending the turn at the end of the US phase. If I’m going to have any effect on US FM the time is now.

Ger (32211)
With the US barrage clear it is time to throw some pain at the squad that is hanging out in the open. A squad deploys in entrenchments from the north JOP and unleashes fire into the squad sitting in the open, an unholy 5 kills and 2 shock sees the group savaged to a standstill. With five kills you’d have thought the JL might get a scratch but the lucky blighter managed to go all matrix on the german rounds and dodged them all (Mike rolled a six to save him). The squad in the boulangerie take enough of a break from munching bread to kill a member of the HMG team. The third and final German Squad deploys into the abandoned entrenchment of the MMG and fires on the HMG causing 1 shock.
Cpl Reeves manages to dodge all the rounds while five of his squad get killed.

US (66622)
Sgt Cook frantically removes shock on the HMG and section to try get them to a workable state with the turn end approaching.
(66541)
The US FOO checks on the mortar battery but they have been tasked elsewhere and won’t be supporting this attack any longer. Quite a blow to the US. Sgt Cook removes more shock.
(51111)
Sgt Cook gets the HMG and depleted squad to provide covering fire onto all German position.
The German barrage ends and the US start to recuperate

Ger (55441)
Otto gets the FOO to repeat the barrage with no effect. He also gets a squad to fire across the road at the squad in the open with no effect, the LMG team on the left flank has more success causing one kill and one shock.
The US end the turn with a CoC die and with no CoC die left for the Germans to counter this, their barrage ends.

US (65421)
The squad in the open removes shock and Sgt Cook keeps the covering fire going.

Ger (55421)

Otto asks the FOO if he can get the barrage back up but the mortars have been re-tasked. No more support available now! This leaves the Germans in a bit of a precarious postion. A squad fires into the HMG with no effect and the LMG team on the left flank again has more success but only inflicts 1 shock. The covering fire is keeping that squad in the game!

US (43211)
Without needing to contend with the  barrage the US can focus on getting their attack moving again. The remaining Sherman finally gets into the action and fires HE and MG into the squad in the boulangerie killing one and dropping 2 shock on them. The 60mm Mortar tries its luck at dropping a shell on the cluster of the FOO, SL and panzershreck team but fails to hit. Sgt Cook gets the HMG to fire at the squad in Boulangerie too and kills 2 and adds one more shock.
Oscar decides to intervene on behalf of the Americans. Big cats are too hard to deal with so the Germans withdraw.
With three casualties in one phase and the protective barrage now gone it is turning into a slug fest, at some point I inflicted a wound on the JL in the hedge line south of the road, and his FM dropped to 6, but aside from that his morale was not dropping and his leaders were staying in the game with some helpful dice rolls. At this stage I decided I was only going to lose more men and it would be a gamble as to whether I could drop his FM before he inflicted more lasting damage on my platoon, so I sounded the retreat and withdrew. US victory.

I took three casualties, one would never return and two would miss the next game. All squads were within 12” of JOPs and unpinned so withdrew successfully. I ended on an FM of 7 and the US on 6.
The Germans will go into game four 6-men down. As mentioned before two would be back for game five.

As we stand after three games the US are only just getting onto Map 2, largely I think due to the fact that we are both still learning the game, but it also means I only need to delay him by one more game to get a partial victory, albeit with the brave defenders getting captured, or two games for an outright victory. With that in mind it seemed wiser to withdraw and face the US with fewer support points that try hang on and face them on map one again with potential much fewer men and against more support.

On to Arthenay!

Turner and Cook - 29 Let's Go Game 3 preamble

The huns were not giving it up easily.

Twice they had managed to throw back the US troops sent against them. But not this time. This time they would be facing Lt Ernest Turner, and he was not about to let them stop his platoon, and he had the equally implacable 1st Sgt Elmer Cook to back him up.

The loss of a Sherman tank had stung the last platoon, and to hear them talk about it the Germans had masses of artillery and firepower to throw at them.

Ernest suspected it was more likely some mortars and a well positioned MG42. He was no fresh faced officer straight out of training, he had worked his way up through the ranks and earned his position.

Sgt Cook was similar, an older man with none of the "rabbit in the headlights" approach the younger inexperienced men in the division had.

This time it would be different. This time 29 Infantry Division would prevail.

All they had to do now was wait for Col Goode to order the move. He was dithering. Nervous and wanting more artillery. Turner couldn't give two hoots about artillery, he had the men and equipment to push through La Cambe and he wanted to be let loose to do it.

Monday 29 October 2018

Testing some materials

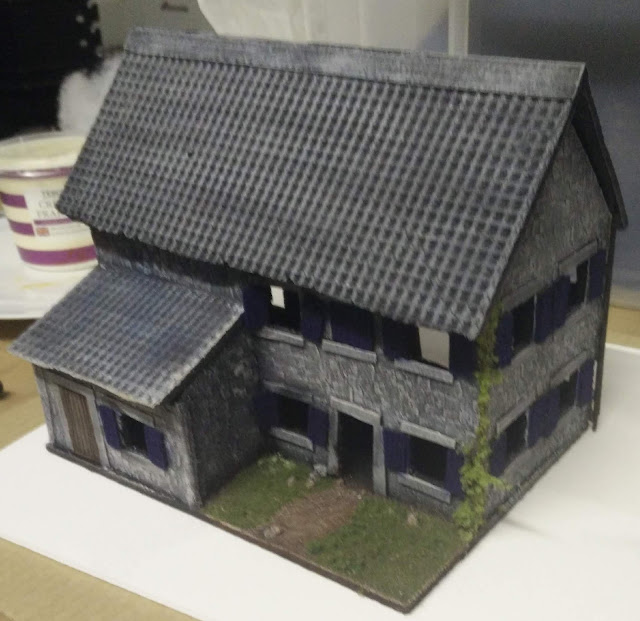
Whilst browsing in The Range I came across a wallpaper pattern that immediately recommended itself for use in a scratch build. It has a rather lovely pattern of stonework across it. Whether this will still come through after painting it, I am not sure. So instead of being sensible and testing a patch first I'm going to jump in a make a building and keep my fingers crossed.

Prior to the last encounter in the 29 Let's Go Campaign I was perusing the map for game two, to make sure I had everything I needed to create a serviceable layout. I'm sure I could but there is an L-shaped building that I don't have anything similar to. Not really a big deal but as I want to make something anyway I may as well try this!

With a bit of finger in the air and heel stamping on ground, I've come up with a rough layout size and design, and cut some walls from cork to suit. The cork comes from a pack of place-mats I purchased when lost in IKEA. I have now realised there is a shortcut and you don't have to wander aimlessly through every bloody bit of it to get out of the infernal Swedish maze. Anyway.


With the cork cut out I make my first mistake. To some walls I started to add lintels and ledges (by gluing cut up coffee stirrers on), until I realised that actually gluing the wallpaper on first, then the lintels etc would be much simpler.


After much wailing and gnashing of teeth I was suitably humbled and ready to proceed.

The wallpaper was easily cut out and to size for the latter walls, but the former required a bit of finangling to get fitted. Once the pieces had dried they could then be assembled and glued into position.

And here we have mistake number two. I now have a gap running down the wall where two butt up together. Probably should have added the paper after gluing it all together. To fix it I simply beveled the edges slightly to allow them to fit together rather than just butt one up against the other. Not perfect but with a bit of filler I'm hoping it will pass muster.


I've also added some supports to hold up the first floor to the inside, just small bits of foam cut out and glued into position. The small roof section is from a foam platter that you sometimes get in supermarket pizza boxes. The pattern looks a bit tile-like so I'll see how it looks fully painted up and if it gives a decent impression of being a roof then it stays, if not I'll add card roof tiles to jazz it up! In the above photo it has been painted in grey and I think is looking alright.


The main roof is made of the same stuff and with a black base coat, followed by some grey dry brushing I think it looks alright. I've also added some kebab skewers onto the corners, firstly to hide the dodgy joins or rather gaps in the wall paper but also to add detail!


Here I shamelessly stole the idea from Hendrik on the TFL Forum and his Chateau build to add some growing stuff up the side, again to mask some gaps.


Here it is almost done, green bits added, shutters painted but I still need to give them a highlight to bring them out. I also tried adding a bit of blue wash to the smaller roof to break up some of the uniformity and I don't think it worked! I need to water it down a lot more so it is just a tinge and not a great big blue splodge. Ah well, you live and learn.


For a cheap wee cork, wall paper and pizza foam build I'm rather satisfied with the result (touch up work not withstanding). I would probably put fewer windows in next time I make something, I think they take up too much space. Thoughts and comments welcome!

Friday 19 October 2018

I'm on the Hedge of Glory

Sadly I haven't kept any pictures from our first game in the 29 Let's Go campaign. If I had you would have seen some improvised and rather jarring hedges. As I laid out the terrain for the game I quickly realised that I had no where near enough hedging to closely approximate what was shown in the PDF. Cue frantic terrain building.

What I had to work with was some coconut fibre plant basket liners and some ePVC sheets. I had intended to make more hedges and vegetation which was why I had them, I just hadn't got round to starting.

So to the improvised hedges. I cut strips of the fibre and hot glued them onto some ePVC. And that was it. Ugly white bases and brown fibre hedges, but it would do the job for the game ahead.

I've now roughly calculated that I will need some more hedging for some of the other scenarios, and a few extra for the first scenario wouldn't hurt. So I'll use the same idea and make up some more.

Coconut fibre is cut up into strips and they get hot glued onto the ePVC bases. Next PVA onto the base and sand added. These will get a spray of PVA/water mix once dry to seal and strengthen the adherence of the sand to the base. Once the sealing spray has dried they get primed with black emulsion, not worrying too much about getting the fibre covered. Some simple dry brushing of various browns finishes off the dirt bases.


The hedges doused in PVA and a dark green flock added to give them a contrasting shade to my grassy playing mat. I noticed when setting up the last game that in certain light some of the hedges I've made previously blend into the grass. Not necessarily a problem but I want more contrast going forward so went with a darker tone in this case. I'm half tempted to look at getting some darker tones onto the old hedges but that is a decision for another day.

After coating them once I felt I wanted a more complete coverage so went about applying more PVA and more flock. I've realised (or from helpful comments on the TFL forum) that using sawdust type flock means you can't get a good final seal and keep the stuff on, so I have started using foam flock from LukesAPS range at Geek Gaming. It is rather nice stuff actually and so far seems to stay on with the PVA treatment. Success!


And finally some flock on the bases to finish them off. Now all I need to do is remember to take the bloomin' things next time!


Friday 12 October 2018

Orchard rip off

In preparation for game 2 of my 29 Let's Go Campaign I felt I wanted to have a better representation of orchards. There are a number of Orchards represented on the 29 Let's Go campaign maps so I thought why not start there. Especially as the fantastic Tactical Painter has already paved the way with his take on orchards (they appear in his Storming the Citadel Campaign) or plantations. So I am copying him.

I've cut out a number of plywood bases (just what scraps I had to hand), shaped roughly then sanded them down. Onto these I have glued willow sticks. I got these from a roll intended to be used as garden or flower bed edging. It cost £1 and I've barely dented the supply!

After that they get some caulk/mastic to blend into the base and create a little variation on the ground. Then a daubing of PVA and scattering of dried used coffee. I had some coffee grounds left over from a while ago when I was collecting and drying them for use as a basing material, I've decided now that sharp sand is just way easier to deal with. These are base coated in black emulsion.

 I found my initial hot glue job to get the willow sticks to adhere to the plywood was not quite sufficient and some felt wobbly. I went over all of them, adding wire as outriggers to the worst offenders but largely just a lot more hot glue and in a way as to give an impression of roots. They got painted up and a wee dry brush and I am much happier with them.


Next I glue on various bits of polyfibre out an old obliging pillow, again using hot glue. They get sprayed black to cover up the whiteness.


Once they have dried the polyfibre gets a spray of adhesive and a coating of foliage. At this stage they got used in the game as I had not got round to the final floor covering, and I think for the purpose they did well! There were certainly more distracting items of terrain on the board, namely some impromptu hedging and roads. Sigh. Still annoyed with myself over that one.


Finally some flock is added to the bases. And there we have it, some orchards! Some of the flock on the trees has fallen off, despite spraying PVA/water mix over them. Not sure how to combat it, I've tried a spray varnish which helps but never removes the problem entirely. As it stands I think they currently look alright as the darker patches act to break up the colour and add some depth to the foliage.