Ah another game in the campaign after a rather long gap. As seems to be the case the ubiquitous "life" manages to get in the way. Actually I blame my opponent as I could have squeezed a game in on a number of occasions but his calendar has been rather packed!
Having squarely placed fault in his court, let's move on to the game. It was a very peculiar game for me, and rather than give anything away at this stage we may as well jump into my ramble of what happened. Again not enough photos and notes but I shall muddle along.
It was a slow start, the past two scenarios are rather straight forward in terms of the patrol phase, this one had us both scratching our heads a little. We placed out the patrol markers to start the phase and then decided to redo that as we discussed how we could each deploy and possible tactics. Because we are both still rather new to the game we tend to discuss each others plans and options at each stage as it helps refresh memories on what we can do!
I'm not at all convinced I got this phase right, but I'm struggling to think of a better way to have approached it. Ideas on the back of a postcard....
Mike, playing the US, rolled a six for his free patrol moves so got the maximum of four. He moved up on his long edge seeking to probe behind my short line of patrol markers. I quickly managed to shut down that flank by locking down one of mine and two of his patrol markers that were stacked together. I thought that was a good outcome but by doing that he had effectively pinned my defence around that marker as the other could only move 12" from it (24" total by daisy chain if that makes sense) so my other two patrol markers could only really maneuver around that fixed point.
With that anchor I could only really shuffle my markers around a little and after a somewhat lengthy and indecisive patrol phase I eventually managed to get all my markers locked down to end it! The two separate entry points really throws off where you can put JOPs. Mike really only had four "angles" so was a bit limited in where he could place his markers but it left him with two pairs on his two table edges, on the long edge near my defensive quarter he had one sitting out, tantalizingly, in the open.
My options felt more limited. I got one in the rear of the church, and one forward of that behind the fencing. The final one was behind the row of houses on the other side of the road from the church. My fourth "free" JOP I selected to be in the building to the rear as a back up.
At this stage I felt alright - the patrol phase hadn't gone as I'd expected but then I don't think it gave Mike any significant advantage either. It'll be interesting to play another flanking scenario to give this all another shot.
Mike opened up the main game with a double six. Immediately we discussed the viability of charging a squad towards one of my JOPs, the one behind the houses, as his JOP lying out in the open would give him a short dash to get there. My JOP was right on the edge of my defences so a full 24" from his JOP on the table edge. So deploying 6" would take that down to 18" to run, 14" to get into closing down territory. He was sorely tempted to try it but decided against the "rush of blood to the head" approach. The chance of rolling low and leaving a squad in the open to be hit by an MG42 just did not appeal to him thankfully!
What he did end up doing was the start of a very comprehensive attack. He brought on one of his Shermans and set the guns on overwatch, his FOO came on and contacted the battery for support, and the first of his senior leaders came on close by to ensure that support would arrive rapidly!
His second phase saw the arrival of a single squad on the flank covering their JOP out in the open, the FOO called in a ranging shot on the church and it came in bang on target. That's going to cover two of my JOPs when it hits and I haven't yet had a phase!
On my phase I pulled on a squad to protect my JOP, not wanting to leave it open in case he moved up on the flank, and also wanting to cover any movement his squad would make. It would make any deployment from his JOP in the open a rather dicey prospect. Seemed like a decent idea at the time.
The Sherman moves up and keeps the MG on overwatch. A Marder deploys for the Germans along with a Panzershrek team into the building on the right flank.
A second Sherman appears, as does a second squad further back. The FOO calls in the barrage and in a rather unlucky roll (or lucky) makes the church unstable.

**We decided to roll for the building despite no squads being present as it made sense to the narrative that the US were targeting the church where they had seen a lot of German activity (2x JOPs)**
The German JL puts the squad on overwatch and the Marder trundles forward cautiously.

The second Sherman moves up as well and maintains overwatch with its MG.
The Marder moves forwards trying to get closer to the building edge and get a view of the Sherman.
The second tanks moves forward again and fires at the building with the Panzershrek team with no effect, and the second squad moves up slowly using tactical movement.

The Germans call in a second Marder and get the Panzershrek team to get out the building before more HE rounds start winging their way at them.
The US have the first Sherman move towards the church and maintain overwatch. the squad continues to move tactically.

The second Marder moves up and looks to get an angle up the road should the barrage lift. The panzershrek team navigates its way very slowly over a fence,

Both Shermans are set on overwatch on MG and main gun,
The Germans do nothing.
US achieve the first CoC dice but can't get any units to activate.
The Germans get their first CoC dice and send the panzershrek team to start moving towards the road, in hopes of looping around the barrage and getting a shot at the Shermans from a less dangerous angle.

A bazooka team deploys to the rear with the FOO and platoon sergeant. The panzershrek team continue to move edging their way over a hedge.
US get a double phase and get a squad to cross the hedge and into the plowed field, the Sherman to their rear manoeuvres to maintain sight and cover of the German JOPs. In the second phase the Sherman is returned to both Guns on overwatch and the squad moves tactically in the field, moving towards the church and looking to close down the furthest forward German JOP. The bazooka team moves up behind the Sherman and looks to get sight of the Marder.
 The panzershrek team has a change of mind and moves forward towards the house beside the road, hoping to set up in a position to take a shot should the barrage lift. The first Marder reverses slightly to stay out of sight of the bazooka
More shuffling of Shermans and squads to get the US squad closer to the JOP. The Germans move the panzershrek team up to the corner of the house ready to take a shot if it becomes available.

The US get their second CoC die and move the barrage forward a little way to allow the squad to close down the JOP.
Here I swither over whether to try deploy just outside the church to try and damage the US squad. The problem is I'm facing 4 guns on overwatch from the two tanks, and with the rolls Mike has been getting he has managed to activate at least one tank if not two and a squad nearly every turn. So after the overwatch fire, I'd then face about the same in the next phase. I doubt a squad in light cover at best will survive much of that, and decide against deploying. (I also clearly forgot about pictures after this too)
The US waste no time in capitalising on the German hesitance and move the barrage forward again, this time it hits the Marder and the panzershrek team, The Marder shrugs it off but the panzershrek team receives three hits, and these end up as kills. With a team wiped out I convert that into two points dropped on FM (9) with a lovely roll of 6. Typical. The us squad pushes forward a little and makes it over the fence surrounding the church, getting into base contact with the JOP.
A double 6 for the Germans. I suspect this is all but over however I try a bit of a long shot and deploy a squad to the far side of the rearmost building and look to get a squad moving up the table edge to try hit the US squad before they can enter the church and capture another JOP.
In my second phase I reverse the Marder out of the barrage and move the squad on the left across a hedge towards the church.
After a quick discussion on sequence and intent (I explained that if he wanted the turn to end he should do it at the end of my phase and before he rolled the dice) Mike decides to end the turn and keep his barrage going.
His rifles move forward to close down the JOP in the church and the Sherman swings slightly to counter the German Squad moving up the left flank. The turn end resulted in a bad things happen roll for me which I managed to get as another 2 point FM drop (7).
At this point I withdraw. I had allowed myself to get boxed in and the overwhelming firepower I was facing made me feel like if I tried to engage I would end up getting pasted. I was struggling to get dice rolls that would allow significant deployment and when I did I had positioned my JOPs rather poorly and in a way that wouldn't allow me to engage the enemy in anyway near parity. Partly this is due to the barrage removing the church as a viable defensive centre piece.
I have been woeful in keeping track of the post game changes however to get it up to speed Col Goode is back to a Concerned outlook having dropped down to trouble and even worried after the first two lost games.
The Germans are actually faring rather well. Both the Men's opinion and the Commanders are sitting at 0. Although the commanders opinion isn't tracked until contact with Isigny is re-established again I have been tracking it to try and remind myself I need to get in the habit of doing it. The Main platoon is down 6 men and I'll need to decide when I bulk them up with some reinforcements. I'm rather tempted to do this for the next game and try avenge this poor performance.
I've come away from it feeling that I simply did not do enough:
1) I should have taken more risk and been much more aggressive. I was cowed into submission by his Shermans being on near constant overwatch, and his barrage rendering two of my JOPs rather useless. For all that I had two Marders that realistically could have been thrown at the Shermans as I can't take them with me to the next table! I may have lost morale due to them being blown up but that would have been better than the collapse due to the panzershrek team being hit by a mortar and then the loss of a JOP. I was scared to commit troops and that gave an easy victory to my opponent.
2) I also deployed poorly. I should have kept the panzershrek off-table and had it available for an ambush. On table it was struggling to get a position especially as neither of us were rolling sixes to end the turn and I wasn't getting many fives to generate a CoC dice to end it that way.
3) Ultimately I think I lost because I had no clear plan of what I wanted to achieve and how beyond a vague aim of trying to lower my opponents force morale.
At the time it felt like I had little option but to call the retreat. I could see no way of levering my way into the game at that stage and it felt like Mike was getting all the right dice when he needed them and I was not. I knew he would take a FOO but with no ability to take support options beyond the two Marders I needed some way to counter his FOO and I could not come up with anything,
In reality I gave away the game early on by allowing him to build up control of the area. I could have brought on both Marders and looked to use them in tandem to harass him, I may well have lost one but the quicker they were on the board and being aggressive the less his tanks could have pressured me. With the tanks occupied I would have been more secure in deploying some troops and using the LMGs to try pick off the FOO and Senior Leader sitting at the rear, with two leaders in close proximity with only a bazooka nearby I would have been certain to cause some sort of pressure on his morale, maybe even neutralise the barrage.
Oh well, this is what comes from not being prepared! Five minutes spent at the start of the game thinking about how to tackle the problem would have been time well spent. It has been a very good learning experience and points out yet again how good CoC can be at giving that real command experience. I should correct that, the lesson on planning has clearly been identified. Now we shall see if I can actually make the change and act on it in future!
Having squarely placed fault in his court, let's move on to the game. It was a very peculiar game for me, and rather than give anything away at this stage we may as well jump into my ramble of what happened. Again not enough photos and notes but I shall muddle along.
The patrols
German FM starts at 11, US FM starts at 9.It was a slow start, the past two scenarios are rather straight forward in terms of the patrol phase, this one had us both scratching our heads a little. We placed out the patrol markers to start the phase and then decided to redo that as we discussed how we could each deploy and possible tactics. Because we are both still rather new to the game we tend to discuss each others plans and options at each stage as it helps refresh memories on what we can do!
I'm not at all convinced I got this phase right, but I'm struggling to think of a better way to have approached it. Ideas on the back of a postcard....
Mike, playing the US, rolled a six for his free patrol moves so got the maximum of four. He moved up on his long edge seeking to probe behind my short line of patrol markers. I quickly managed to shut down that flank by locking down one of mine and two of his patrol markers that were stacked together. I thought that was a good outcome but by doing that he had effectively pinned my defence around that marker as the other could only move 12" from it (24" total by daisy chain if that makes sense) so my other two patrol markers could only really maneuver around that fixed point.
With that anchor I could only really shuffle my markers around a little and after a somewhat lengthy and indecisive patrol phase I eventually managed to get all my markers locked down to end it! The two separate entry points really throws off where you can put JOPs. Mike really only had four "angles" so was a bit limited in where he could place his markers but it left him with two pairs on his two table edges, on the long edge near my defensive quarter he had one sitting out, tantalizingly, in the open.
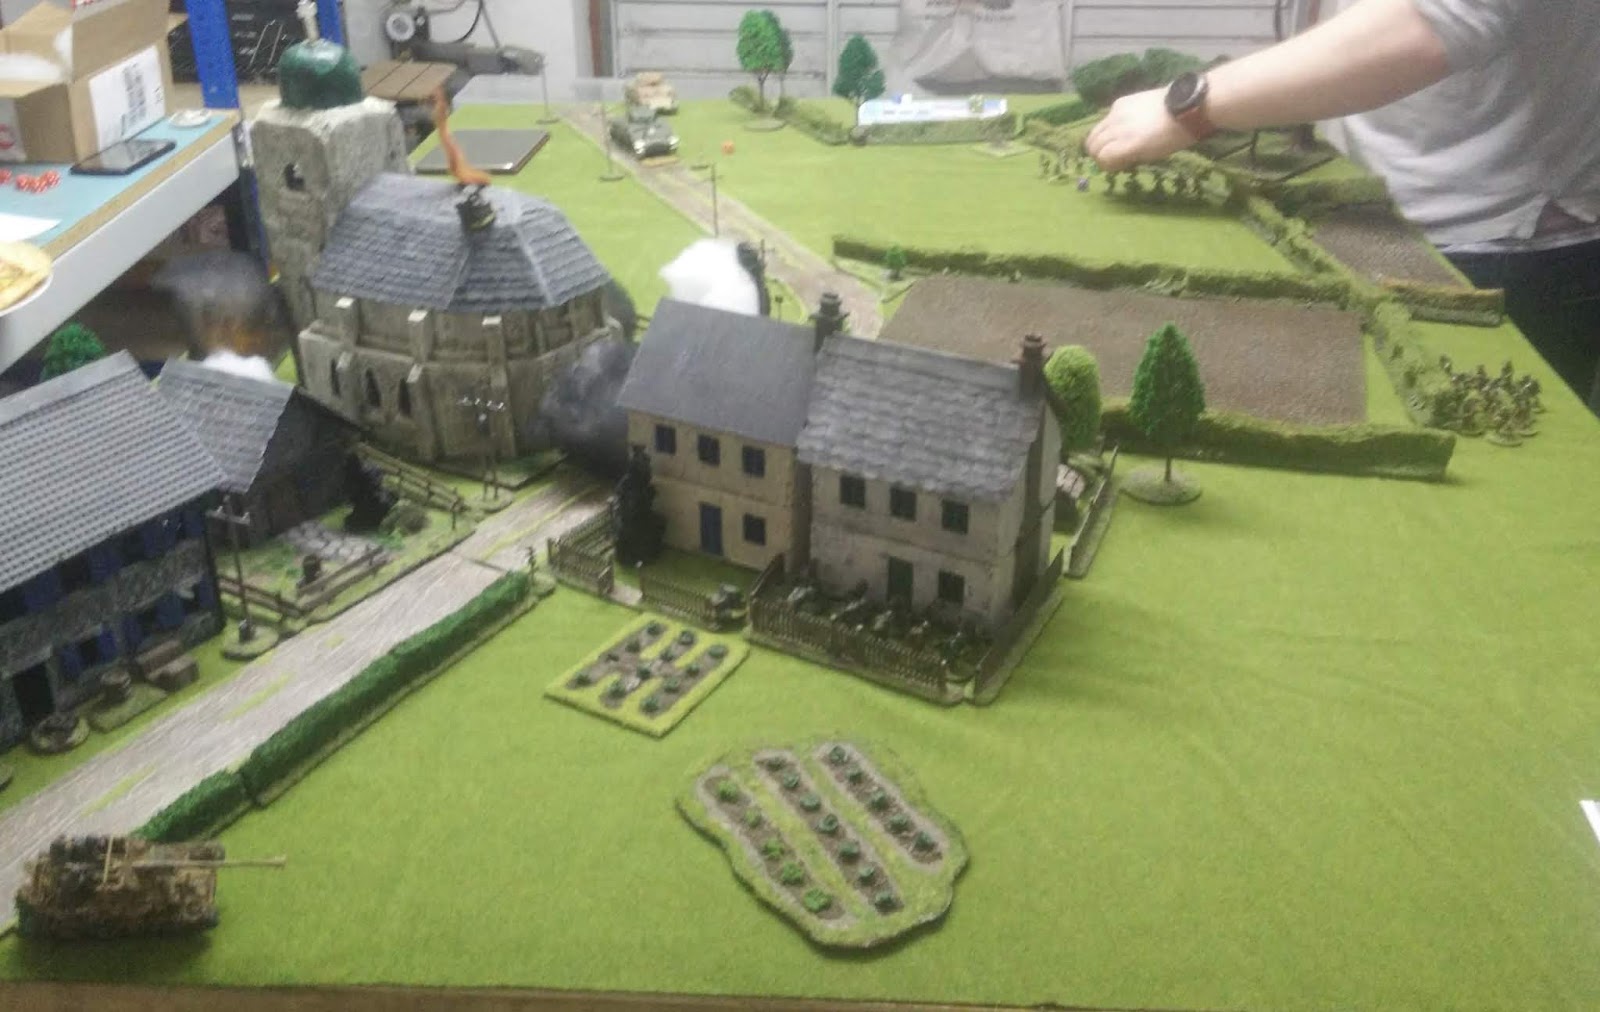
My options felt more limited. I got one in the rear of the church, and one forward of that behind the fencing. The final one was behind the row of houses on the other side of the road from the church. My fourth "free" JOP I selected to be in the building to the rear as a back up.
 |
| German JOPs in red; US JOPs in light blue. |
The assault begins
Mike opened up the main game with a double six. Immediately we discussed the viability of charging a squad towards one of my JOPs, the one behind the houses, as his JOP lying out in the open would give him a short dash to get there. My JOP was right on the edge of my defences so a full 24" from his JOP on the table edge. So deploying 6" would take that down to 18" to run, 14" to get into closing down territory. He was sorely tempted to try it but decided against the "rush of blood to the head" approach. The chance of rolling low and leaving a squad in the open to be hit by an MG42 just did not appeal to him thankfully!
What he did end up doing was the start of a very comprehensive attack. He brought on one of his Shermans and set the guns on overwatch, his FOO came on and contacted the battery for support, and the first of his senior leaders came on close by to ensure that support would arrive rapidly!
His second phase saw the arrival of a single squad on the flank covering their JOP out in the open, the FOO called in a ranging shot on the church and it came in bang on target. That's going to cover two of my JOPs when it hits and I haven't yet had a phase!
On my phase I pulled on a squad to protect my JOP, not wanting to leave it open in case he moved up on the flank, and also wanting to cover any movement his squad would make. It would make any deployment from his JOP in the open a rather dicey prospect. Seemed like a decent idea at the time.
The Sherman moves up and keeps the MG on overwatch. A Marder deploys for the Germans along with a Panzershrek team into the building on the right flank.
A second Sherman appears, as does a second squad further back. The FOO calls in the barrage and in a rather unlucky roll (or lucky) makes the church unstable.

**We decided to roll for the building despite no squads being present as it made sense to the narrative that the US were targeting the church where they had seen a lot of German activity (2x JOPs)**
The German JL puts the squad on overwatch and the Marder trundles forward cautiously.
The second Sherman moves up as well and maintains overwatch with its MG.
The Marder moves forwards trying to get closer to the building edge and get a view of the Sherman.
The second tanks moves forward again and fires at the building with the Panzershrek team with no effect, and the second squad moves up slowly using tactical movement.

The Germans call in a second Marder and get the Panzershrek team to get out the building before more HE rounds start winging their way at them.
The US have the first Sherman move towards the church and maintain overwatch. the squad continues to move tactically.

The second Marder moves up and looks to get an angle up the road should the barrage lift. The panzershrek team navigates its way very slowly over a fence,

Both Shermans are set on overwatch on MG and main gun,
The Germans do nothing.
US achieve the first CoC dice but can't get any units to activate.
The Germans get their first CoC dice and send the panzershrek team to start moving towards the road, in hopes of looping around the barrage and getting a shot at the Shermans from a less dangerous angle.

A bazooka team deploys to the rear with the FOO and platoon sergeant. The panzershrek team continue to move edging their way over a hedge.
US get a double phase and get a squad to cross the hedge and into the plowed field, the Sherman to their rear manoeuvres to maintain sight and cover of the German JOPs. In the second phase the Sherman is returned to both Guns on overwatch and the squad moves tactically in the field, moving towards the church and looking to close down the furthest forward German JOP. The bazooka team moves up behind the Sherman and looks to get sight of the Marder.

More shuffling of Shermans and squads to get the US squad closer to the JOP. The Germans move the panzershrek team up to the corner of the house ready to take a shot if it becomes available.

The US get their second CoC die and move the barrage forward a little way to allow the squad to close down the JOP.
Here I swither over whether to try deploy just outside the church to try and damage the US squad. The problem is I'm facing 4 guns on overwatch from the two tanks, and with the rolls Mike has been getting he has managed to activate at least one tank if not two and a squad nearly every turn. So after the overwatch fire, I'd then face about the same in the next phase. I doubt a squad in light cover at best will survive much of that, and decide against deploying. (I also clearly forgot about pictures after this too)
The US waste no time in capitalising on the German hesitance and move the barrage forward again, this time it hits the Marder and the panzershrek team, The Marder shrugs it off but the panzershrek team receives three hits, and these end up as kills. With a team wiped out I convert that into two points dropped on FM (9) with a lovely roll of 6. Typical. The us squad pushes forward a little and makes it over the fence surrounding the church, getting into base contact with the JOP.
A double 6 for the Germans. I suspect this is all but over however I try a bit of a long shot and deploy a squad to the far side of the rearmost building and look to get a squad moving up the table edge to try hit the US squad before they can enter the church and capture another JOP.
In my second phase I reverse the Marder out of the barrage and move the squad on the left across a hedge towards the church.
After a quick discussion on sequence and intent (I explained that if he wanted the turn to end he should do it at the end of my phase and before he rolled the dice) Mike decides to end the turn and keep his barrage going.
His rifles move forward to close down the JOP in the church and the Sherman swings slightly to counter the German Squad moving up the left flank. The turn end resulted in a bad things happen roll for me which I managed to get as another 2 point FM drop (7).
At this point I withdraw. I had allowed myself to get boxed in and the overwhelming firepower I was facing made me feel like if I tried to engage I would end up getting pasted. I was struggling to get dice rolls that would allow significant deployment and when I did I had positioned my JOPs rather poorly and in a way that wouldn't allow me to engage the enemy in anyway near parity. Partly this is due to the barrage removing the church as a viable defensive centre piece.
Post Game Admin
The Germans are actually faring rather well. Both the Men's opinion and the Commanders are sitting at 0. Although the commanders opinion isn't tracked until contact with Isigny is re-established again I have been tracking it to try and remind myself I need to get in the habit of doing it. The Main platoon is down 6 men and I'll need to decide when I bulk them up with some reinforcements. I'm rather tempted to do this for the next game and try avenge this poor performance.
When the Dust had settled.
I've come away from it feeling that I simply did not do enough:
1) I should have taken more risk and been much more aggressive. I was cowed into submission by his Shermans being on near constant overwatch, and his barrage rendering two of my JOPs rather useless. For all that I had two Marders that realistically could have been thrown at the Shermans as I can't take them with me to the next table! I may have lost morale due to them being blown up but that would have been better than the collapse due to the panzershrek team being hit by a mortar and then the loss of a JOP. I was scared to commit troops and that gave an easy victory to my opponent.
2) I also deployed poorly. I should have kept the panzershrek off-table and had it available for an ambush. On table it was struggling to get a position especially as neither of us were rolling sixes to end the turn and I wasn't getting many fives to generate a CoC dice to end it that way.
3) Ultimately I think I lost because I had no clear plan of what I wanted to achieve and how beyond a vague aim of trying to lower my opponents force morale.
At the time it felt like I had little option but to call the retreat. I could see no way of levering my way into the game at that stage and it felt like Mike was getting all the right dice when he needed them and I was not. I knew he would take a FOO but with no ability to take support options beyond the two Marders I needed some way to counter his FOO and I could not come up with anything,
In reality I gave away the game early on by allowing him to build up control of the area. I could have brought on both Marders and looked to use them in tandem to harass him, I may well have lost one but the quicker they were on the board and being aggressive the less his tanks could have pressured me. With the tanks occupied I would have been more secure in deploying some troops and using the LMGs to try pick off the FOO and Senior Leader sitting at the rear, with two leaders in close proximity with only a bazooka nearby I would have been certain to cause some sort of pressure on his morale, maybe even neutralise the barrage.
Oh well, this is what comes from not being prepared! Five minutes spent at the start of the game thinking about how to tackle the problem would have been time well spent. It has been a very good learning experience and points out yet again how good CoC can be at giving that real command experience. I should correct that, the lesson on planning has clearly been identified. Now we shall see if I can actually make the change and act on it in future!