Showing posts with label wargamer. Show all posts

Tuesday, 26 May 2020

Rangers of Shadow Deep - Mission 1, Scenario 1

Rangers of Shadow Deep - Mission 1, Scenario 1 - Deserted Village

My first game of RoSD. The setup is on a 3x3ft area, the group starts in the centre of a deserted village with 5 abandoned buildings. There are 6 clue markers, 4 in line with each intermediate compass point (NE,SE,SW,NW) and about 14 inches away from the centre. The final two are in two random buildings.


The scenario starts with 2 Giant rats on the table and 2 zombies. As companions I selected the following: Templar, Rogue, Man-at-arms, Conjuror, Arcanist. I passed the task roll for perception and was able to move 1 clue marker closer to the group starting position.


In the first turn my Ranger attempted to shoot a rat. Missed. Arcanist, Rogue and conjuror moved north, the rogue towards a building with a clue. To note here I probably shouldn't have allowed myself to know which buildings had clues, it would be easy to simply roll once the door had been breached, it would have made the mission more complicated at least!


The Man-at-arms and Templar moved south to another clue marker in a building and closer to the southern zombie. I then moved the zombies and rats, which was wrong, they should have activated before the companions moved. No harm on this round and a good lesson to remember the proper sequence!


The Templar was getting good rolls and she twatted the zombie in one hit. The Arcanist was fortunate that the zombie closing in on her required both actions to move to get to her. The conjuror was well placed to send a bolt of magic into the zombie allowing the Arcanist to move away, in some panic! The Rogue set to work on picking the door lock and succeeded. However the clue marker inside resulted in a zombie being in the house and surprising her.


I got this bit wrong, I allowed the Rogue to move away which when having an enemy in base contact, I don't believe is allowed.


At turn end more zombies started deploying as a result of the event deck. The basic strategy involved utilising the Templar, Man-at-arms and Ranger to use their combat skills to kill off the enemies while the others tried to sweep up the clues. It largely worked. The ranger had to move north and support the squishy types at one point but withdrawing and consolidating towards the fighters allowed them to survive and continue uncovering the clues.


The conjuror even managed to pick up some treasure, which turned out to be an explosive flask. The zombies and rats came on thick and fast but the waves were defeated without too much hassle luckily although the Arcanist took a big hit but limped through on 2 hit points!


It was a fun game and moves quickly when you get a grip on the basics. There is a good amount of uncertainty so works as a solo game nicely. And as mentioned earlier I can ramp this up by "hiding" the clues in random buildings, or more accurately, rolling for them once the door has been opened.

All in all a great wee game, plays well and easily and not much of a burden in order to get on the table. 

Wednesday, 22 January 2020

Attitude in wargames

There have been a number of interesting threads on twitter and some blogs discussing or raising issues with various game mechanisms in Chain of Command with regards to dice. Essentially around the situation where one party takes a pre-game barrage or Stukas and the other fails to deploy or have a meaningful impact on the game. I have found them very interesting and to my mind it raises the question of tactics and friction, and realism.

I have had one experience of a particularly frustrating in-game barrage (here) and at the time I got rather annoyed at it. I felt I was beaten by a game mechanism rather than my opponent. When I reflected on the game later, what beat me was my own attitude. I ran out of ideas or my brain shut down and I couldn't/didn't think through the problem. Was the game an enjoyable experience? at the time no, but on reflection it was. I got to spend time with my mate, play with my toys and terrain that I spent ages working on. I got beaten by my own attitude, and my opponent utilising sensible tactics to assault a position.

So when I read about issues on enjoying a wargame when things are going badly I now feel it is down to that person and their attitude.

If you want realism in your games you have to accept that if you put yourself in the position of a commander with a very difficult task, expect that things may well go against you, and sometimes in a catastrophic way. In war you don't always get to do what you want, sometimes the enemy is more effective than you and that is before we even consider friction.

It is a natural reaction to be annoyed/irritated etc when things don't go our way, and I suspect the easiest reaction is to blame the dice, game mechanisms, over-powered units than to perhaps admit that our own attitude was found wanting. I doubt many will agree with me as it is easier to blame the abstract such as an ability to roll dice or a mechanism that prevented me deploying.

There is a reason that in the British Army, good humour is prized. Being cheerful in woeful situations is more useful than being the fastest, strongest or best shot. Too Fat Lardies rules really emphasize this on the table, perhaps it is worth thinking about that as we stand by those tables. Your mood turning sour can ruin your opponents game, is it really worth bringing down what should be a fun time because you aren't getting your own way?

And let's be clear, that is what it comes down to. It may be framed as bad dice, poor mechanics or inadequate rules, but regardless of those the one thing we can bring to any game or rule set is a positive disposition. Yes we all want to be competitive but it is not hard to be good humoured in defeat. If things are going well for your opponent and not for you, smile, chin up and let him enjoy it. By all means keep thinking and planning about how to ruin it, but let that happen on the table and not your face.

You may feel like nothing is going your way and the game itself is broken. So what. The commanders in history faced worse and kept plugging away. There are few things more toxic in leadership than a poor attitude.

Maybe we need to reset our outlook, because frankly shit happens and war is not fair. 

Friday, 8 November 2019

6mm Germans and some straggling Brits

Well I finally got around to flocking the Germans for my 6mm IABSM project. There were also a few Brits to finish from the last batch, I made up 5 more 2p leader bases to take my total to 10 leaders or Big Men for each side, also a whole heap 2in mortars.

I used dark green and light green static grass, 1mm length from Serious Play on eBay, and a mix of the two for blending.

The completed batch

British troops, Big men on 2p bases, 2in mortars on 1p bases.

Brits to the left, Germans to the right.

German troops, with three LMGs.


Some German Big Men on 2p bases, Panzershreks on 1p bases.
The blending on the German Big men isn't great but I think I improved as I went on and got a better technique worked out. Good enough from arms length though!

German sustained fire MG34/43


I've got some AT guns and random support from both sides that need working on, also with Baccus releasing their Panzer IV I took the plunge and got some Shermans, PzIVs, Universal carriers and Kubelwagons and motorbikes. Bonus got paid in last months pay check so decided to treat myself!

Tuesday, 17 September 2019

6mm part 2

I finally got round to basing and finishing off the first batch of 6mm Brits for my IABSM project. I'm using 30x30 MDF bases for ground troops, 3 bases per section, with light mortars on one penny pieces, and big men on two penny pieces (1p & 2p for simplicity)

I plan on using 1p for other supports, ie MMG/HMG, but will put AT guns etc on 30x30 bases as they should be identifiable by themselves.

I'm not sure about basing vehicles yet - I think it is probably the best course of action for longevity but the appearance bugs me a little.

I followed a simple method for the basing, PVA and sand, burnt umber paint, dry brushed up with lighter brown shades (sienna and umber variants). finished with some 1mm static grass in two shades, from Serious Play on eBay.

Anyway enough chatter here are the photos:


Four platoons and Five big men, PVA still wet.

Static grass down and PVA still wet.

One platoon, PVA dried!

Big men and 2in mortars


That's all folks!

Wednesday, 24 July 2019

Deep Fried Lard

Well I have been rather absent in posting anything here of late, and my overriding excuse is working on the house. For the past two months the majority of my time out of work has been spent doing DIY on our house as we finally got our building warrant through. I did manage to sneak in a wee trip over to Musselburgh and Deep Fried Lard, hosted by the Legendary Wee Derek.

It was a fantastic day, and this time I stayed around for the curry which really does make a fine end to the day. Getting to sit around and chat all manner of things, especially wargames, with fellow Lardy Lovers was great fun.

I got to have my first ever shot at Sharp Practice, and a game of CoC in 15mm which was a new experience too. I could go over what games were available and show some dazzling pictures of them but frankly this has been done much better by Jim here and Jeremy has posted fantastic pictures here too. So instead I'll dump some of my pictures here but also give a brief run through of the one of the games I played, and some thoughts on the other! Exciting stuff!

The battlefield perspective from the Garibaldi deployment point

Sharp Practice - Biscotti Wars (Garibaldi)
This was a delightful setup, terrain, figures and configuration of the table! The board itself was setup on a number of packing crates so that the playing surface was raise above the table. This meant there was a lower admin space for off table troops, dice rolls, unit rosters, QRS and biscuits! Those requiring a nibble could express support by selecting garibaldi or bourbon biscuits!

Choose your faction! Vote with your mouth!
The terrain it self was all Grand Manner and painted to an incredible finish, laid out on a Tiny Wargames mat, with a one piece crafted road, cut to size and shape out of a larger piece of rubber or pond liner type material.
Jaw dropping Grand Manner Monastery

So pretty!
The scenario itself was beautifully simple and gave a really good game. Both sides deployed on the same short side of the table (opposite corners) and the objective was to get a unit into the large monastery on the far side of the table and hold it for a turn. This gave both forces an interesting dilemma. Do you make a run for the monastery and try to fend off the other force, hoping you move more quickly, or do you engage early to delay the other force and potentially clear the way for your own to move up to the monastery?

The Leaders and forces available to Garibaldi
As mentioned earlier, I had never played Sharp Practice before this, although I do own the rules and have read them! I decided to play the forces of Garibaldi and would try to disrupt the Bourbon forces as they deployed whilst simultaneously trying to sneak a unit up to the monastery. I hoped to utilise my skirmishers to harass the deploying bourbons enough that they would be distracted enough not to go for the monastery at first.

Things pretty much didn't go to plan almost immediately! I deployed my skirmishers and another unit and looked to move the skirmishers forward to some light cover.


They pretty quickly got hit and some shock from the Bourbon troops with their longer ranged rifles. Bad shots and muskets don't do much to impact a well ordered force at a distance! This ended up sucking in another group to try and absorb some of the firepower.


I did follow part of my plan in setting a small group off to the monastery under the command of a Status 1 leader.

The Bourbon hordes poured onto the table and started marching in column towards the monastery. This force would annihilate my small group heading towards the monastery so some preventative action was needed.

I decided (on earlier advice) that to stand any chance I needed to get my chaps into close combat led by Garibaldi to smash up the less physical (but better drilled) Bourbon forces. I gathered up three units of men and tried to advance towards the bourbons, and picked a gap between two buildings to launch towards.


Sadly it was deemed to be a bit constricted and would impact my ability to charge through, this lead to a bottleneck and basically standing in a group in very close range waiting to get smashed up by the bourbons. Which is exactly what happened.


Rather than let Garibaldi get hit in this bogged down and rather fruitless manouver  I moved him towards another formation and worked on getting them into a position to charge a bourbon unit to the rear, if successful I would potentially be able to attack the bourbons in a flank or rear and relieve my beleaguered troops. Sadly the Bourbons were able to reload and faced the charge head on, I also rolled appallingly which really caused more of the problem! and Garibladi was thrown back with a huge casualty rate.


Now this all was going rather badly, however my sneaky little status 1 leader was making decent progress and by throwing a supplementary leader towards the small group meant I could really get them motoring and remove any shock resulting from the double time marching. The heroic if somewhat pathetic actions at the deployment end of the table had managed to hold the Bourbons back long enough to get within spitting distance of the monastery. All I need was a good run of cards and to survive the long range fire of a solitary bourbon unit.


As luck would have it I got to move my troops to the entrance of the monastery and then only had to endure one instance of bourbon fire before being able to move fully inside in the subsequent turn.


At this point we called it a day, without having to hold the monastery for a turn, and also called it a draw. A fair result I think as although I made it to the monastery, the rest of my forces (90%) were in absolute disarray, and had only survived by being forced back under bourbon fire behind a building which resulted in breaking line of sight and therefore no further morale rolls. And Garibaldi himself had been knocked down and had not yet recovered!


This was cracking good fun! So much so that I now need to sort out a few small forces to give Sharp Practice a go with my erstwhile gaming chum!

The other game was an early war Chain of Command scenario - Going with a bang! I played the Germans, trying to secure a route forward against the defending French who were looking to blow up two culverts before I could seize them.

A brilliant game, where I had my head thoroughly kicked in! I really didn't think losing could be enjoyable but it actually was. It was in 15mm which I hadn't played in before and my goodness it is almost a different game at that scale. I loved it. So much so it has thrown me into confusion over what to do with my collection of 28mm models for a number of future chain of command projects! I suspect I will be unable to part with anything yet so will continue in 28mm but will certainly attempt to build up 15mm too. Easier to strore, cheaper to acquire, and the space on the table is simply glorious!

However as I have most of 28mm para force collected, not to mention some plastic russians, variety of brits, some painted DAK and random FJs,  I think I'll persevere in 28mm for now. All I lack just now is time!

Thursday, 4 April 2019

Amera River Terrain Trial

I picked up some Amera terrain off eBay a while back, a decent number of river sections and a moorland pond piece. Before plunging in and trying to get all them done up I thought I would do the sensible thing and do a test piece for the rivers.

First up I primed the piece in cheap auto spray, then slapped on PVA and covered it in sand. Once dry it got another generous coat of neat PVA to seal it all in and then base coated in burnt umber.

I've never painted up a river before so this next bit is rather trial and error. Blue and green paint layered on and blended while wet to try and achieve something vaguely riverine!


It looks really dark. Too dark. But a quick google of "river" and a swift click on the images tab has given me a little bit of confidence and I'm going to stay the course (boom boom). I'm hoping once there is some flock on it and some water effects it should hopefully look the part.

The banks get a quick drybrush in a beige sandy colour and the river is given a coat of varnish. I was hoping the varnish might be enough to make it look a bit more like a river but I can't really say that it does! Perhaps if my river painting skills were better.

After having varnished I felt it was still too dark and needed some colour difference to create a bit of visual interest. I painted some lighter areas over the varnish, and then having read up on rivers in Henry Hyde's fantastic Wargaming Compendium it seems perhaps some more layers of varnish will help the river effect. So I've added another three layers on top of the last paint job, and flocked it up.


The PVA needs to dry fully but I think it is beginning to look decent. Mr Hyde to the rescue! I do think those extra layers of varnish have really helped it, I think I can get away with painting the others in a similar manner now. I may still try some clearfix water effects  as per Luke of LukesAPS but for now the test is a success.

Tuesday, 26 March 2019

Plant life - it's the only life for me

An attempt at some cabbages or similar plant type thing! I realised too late that I haven't taken photos of the intermediate steps but hopefully it is easy enough  to follow. There certainly aren't many steps!

These are small plastic flowers I think for jewellery making or similar crafting. The bottom one is hot glued onto a plastic base strip, I found it easiest to just run/dot a series down the base then push on each flower.


The second one is cut on one side to the centre hole and folded or bent in slightly -they hold that shape relatively easily and then they can be glued into position. I started to use hot glue as I thought it might hold it most securely as well as any excess would just add character to the plant, but then found it quicker and easier to just use PVA. Hopefully they will remain secure (they have so far)

With the two layers of "leaves" in place I then added  the centres. These are just small bits of paper scrunched up and glued into the centre with a generous dollop of PVA. This was not ideal, the paper kept unfurling despite being soaked in PVA and required constant poking to get it to stay in shape. I'll maybe try this again in future and use small bits of DAS or similar. However the paper does give some nice texture or irregularity to the final product.

They are then coated in black acrylic craft paint. I used a olive green paint as the main colour and a few dry brushes with lighter shades, using yellow to lighten them. They were then detached from the plastic bases (relatively easy by sliding a sharp knife under them. The hot glue base gave a decent size and flat surface which can be dunked into PVA and then placed wherever you want them.


The finished product in situ. The grass is a little too bright as I didn't add enough darker static grass to my mix bag! Gives a rough idea of the finish though. I'm quite pleased with the result and will happily have them add some variety to the next tabletop encounter.

Monday, 25 February 2019

Electricity/Telephone poles

I'm sitting in a rather happy position in that I now only need to sort out a small stream for Map 5 of the 29 Let's Go campaign, and other than that I think I've got everything I need for the remainder of the games. I'm strongly tempted to get some small streams from Fat Franks and close that bit off.

Anyway this has meant that I've finally managed to spend some time on bits of scatter I have had lying around in various stages of completion. I mean I've also started some new scatter but I'll get to that.

First up are electricity poles. I had a few "prototypes" from various bits and piece I had lying around but settled on what I feel is the best option and rather economic to boot. I used some old plastic sprues to create them, it seems the airfix aircraft come in a rather handy round sprue which can be combined either with itself or with rectangular bits of sprue. My favourite for this job are Gripping Beast sprues, partly as they were to hand but also as they had great additional points on them that can act as the insulators on the cross beams. Undoubtedly my terminology is wrong but hopefully you get the idea.

You can see the them rather clearly on the examples above (the three on the left) I now realise that the one on the right is glued on in the wrong way, The box on that one is supposed to be a transformer or some such thing. Not sure if they did it the same way back in 1940s but it adds a bit of variety to it all so I'm overlooking historical accuracy on this!

It is all very simple, especially with plastic cement type glue. Clean up sprue, glue on cross piece (in correct orientation of course), drill hole in mdf base, glue sprue into mdf base. Then the usual, sand glued onto mdf, basecoat, paint, flock.


These were the initial prototypes for the sprue version. I've painted the insulators white as I seem to recall white ceramic ones being used, again not sure on the historical accuracy but it gives me some more scatter to fill up my table.

Monday, 18 February 2019

A poor excuse for an AAR

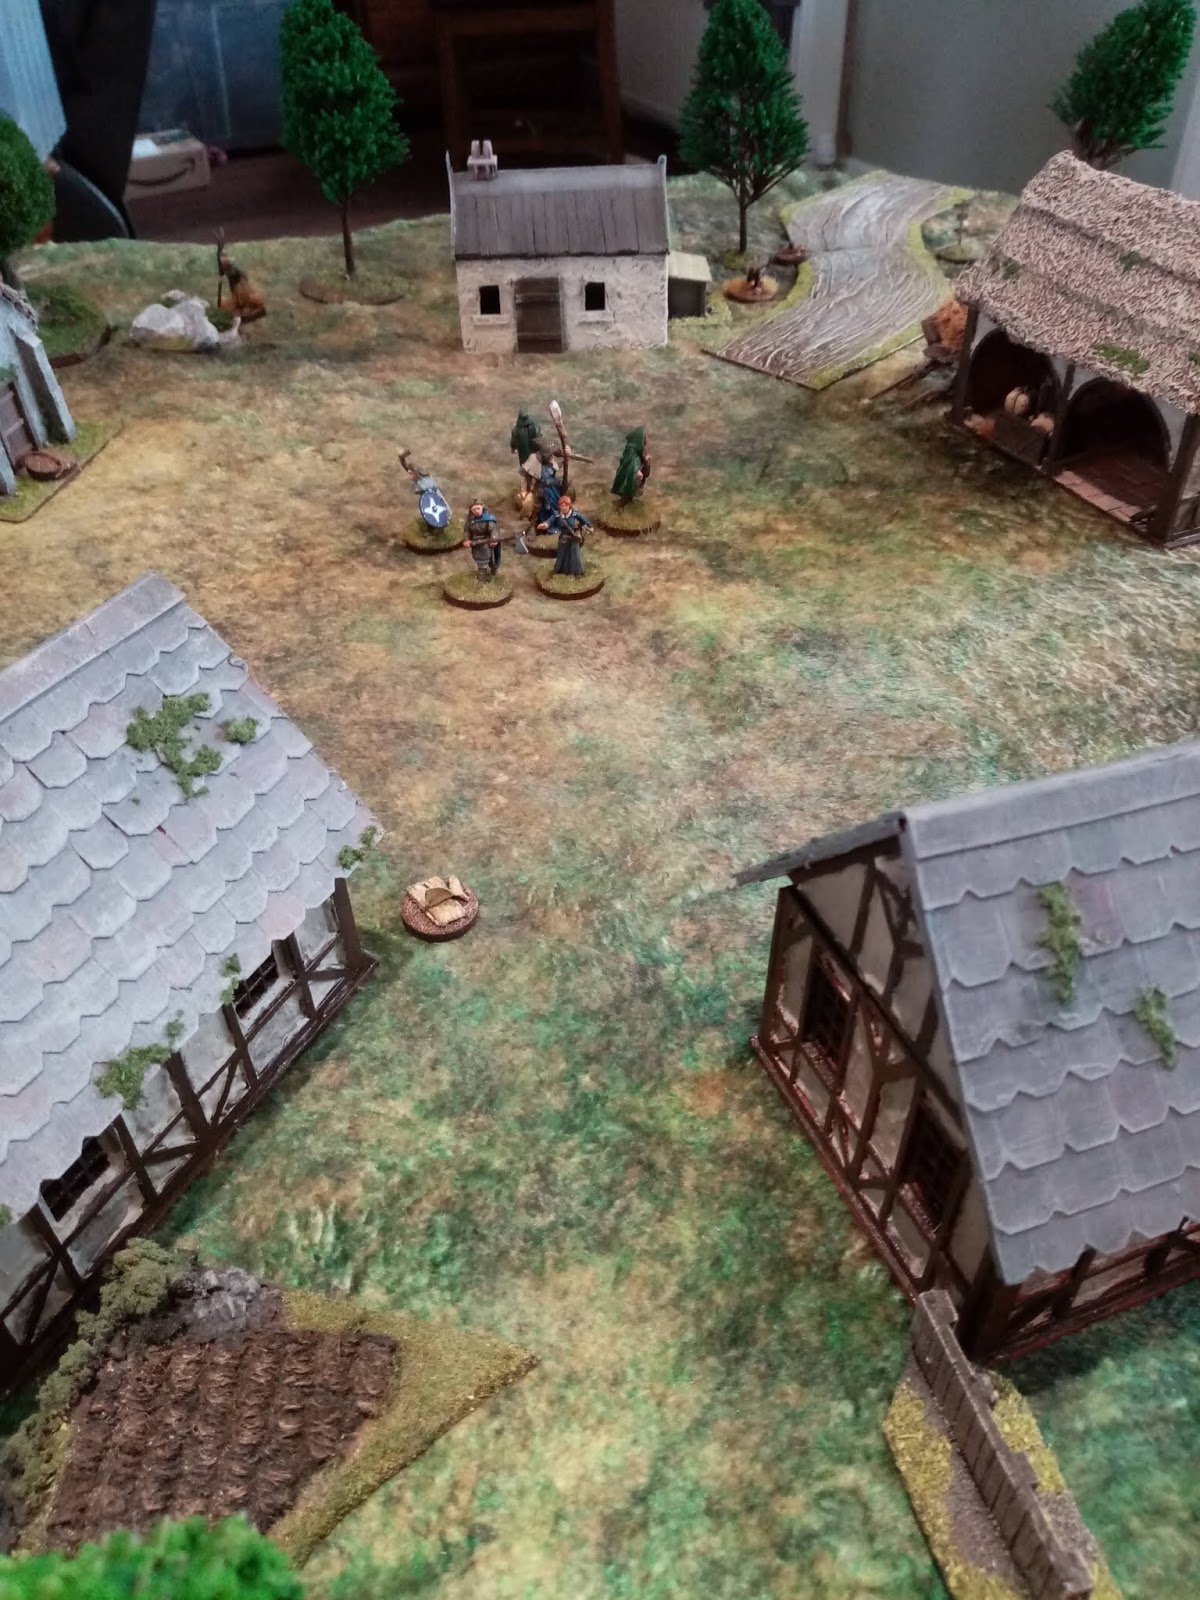
So I got my first game of 2019 in at the weekend. This was the next installment of the 29 Let's Go Campaign and we had finally moved on to the second table: A delaying action at Arthenay.

From German table edge.

From American table edge.


Well the action started and I go so absorbed I didn't take photos or notes. Oh Dear. So what follows is a rough approximation of what occurred, true in spirit if not exactly accurate.

The Americans, commanded by Mike,  started with a dismally low morale roll starting on an 8 whilst the Germans managed an rather outstanding 10. The patrol phase played out with the Americans securing jump off points back at the hedges one on the right flank (for the US) and the other two on the left. Not surprising as that is where more cover is. The Germans had to place one in the "grey box" to the rear so on went into the house just north of the road (US Right Flank) behind the small orchard. One went into the large house across the road and the final went on the US right flank back behind the hedges near the edge of the table. I suspected that Mike would be bringing in a FOO and I didn't want to have all JOPs cluster in an 18in square ready for him to lock down with a barrage and then stroll in.

Given the FOO threat I decided to take the IG 18 option, I swithered between this and a sniper as a FOO counter, last game I had taken a FOO and it starts to feel gamey always going for that option. I figured the 6 HE dice the infantry gun would throw out would be a decent counter for the FOO, especially if I could get him isolated. In addition I took an MMG to bulk up the firepower along with an adjutant to help with the lack of command.

Apart from the suspected FOO I also knew that Mike had to take a Sherman, given the last outing I suspected it would just be the one so was content relying on the hard hitting panzershrek in the platoon on dealing with it. This was not to be the case.

The Americans started with the Sherman coming on via the road with the commander setting them on overwatch and a squad deploying on the right flank out into the ploughed field, adopting a tactical stance. The germans didn't respond.

The Americans then brought on the FOO and a 60mm mortar, the FOO in the corner of the hedges south of the road and the mortar set up in the orchard and went on overwatch. The FOO called up the battery to start the predictable process.

At this point I thought it was best to act before the barrage could get going - or at least start to act to try give myself the best chance of killing the FOO, He was deployed alone and no squad or team nearby to help him out. I deployed the IG 18 and fired at the pesky FOO. A delightful 4 die hit, and Mike obligingly converted three into kills. Checking on the FOO hits table and rolling again resulted in three kill hits (1s and 2s). By any measure that FOO was gone. I was gleefully rubbing my hands together at this point thinking I'd get his FM tumbling already and I could be in with a shot of winning this, especially with his low starting morale and Mike's predisposition to rolling exactly what he didn't need.

Sadly his men shrugged it off with no effect, apparently no one liked Hank anyway.

The hate came back from the Sherman and the 60mm mortar - accumulating shock on the IG and a kill.

The Americans then brought on another squad in front of the 60mm mortar and lining the hedge, and tried to move the squad in the ploughed field although they didn't get far. Mike was rolling a lot of 5s in his command dice which was limiting his ability to activate units but was thundering up the command dice, turn three and already sitting on 5 points.

Now I had deployed a unit, possibly too early, I felt I needed more on the board to split his attention and stop the IG getting killed/routed too soon. I brought on a squad in the central building and threw out some fire at the Americans. I also removed two shock on the IG.

The Sherman fired into the building causing shock and used the MG to put covering fire onto the house. The squad near the mortar jumped the hedge then threw some smoke to cover their move.

I brought on a panzershrek and attempted to nuke the sherman however despite hitting and getting four strike dice I only manage a single net hit due to some good rolls by Mike. The sherman took one point of shock and the driver couldn't be activated in the next phase. I then tried again with the IG, again I managed to hit it but with only four strike dice the Sherman shrugged off the single hit I managed to roll.

Then things became sticky. The panzershrek got focused on by a US sniper who killed one, then the sherman had a crack and killed the other. I converted that into a one point drop in morale. The IG was also getting a lot of attention, the JL taking a wound and dropping to one command initiative.

I pulled on my SL and the remnants of squad (from campaign casualties so far) which was just the LMG team to help out the IG 18. I was chipping away at the squads but the covering fire, tactical stance and poor rolls meant very little was happening. The IG and LMG team were occupying much of the US fire and largely getting shock and removing it, with I think one or two kills.

The US managed to push the squad in the south on their left flank up to the second line of hedges and prepared to push across. I deployed the MMG just outside the house behind a stone wall and proceed to hammer the squad. The leader took a hit and dropped to one command initiative and the FM dropped one point to 7.

The squad made it across the hedge with a decent move to spare and threw some smoke to impair the vision of the German squad and MMG in the house. This got them to a position to be able to use a CoC dice to move a JOP forward to just behind the last hedge they crossed.

This was starting to look ominous for the Germans. With a squad and a Sl still off table the Americans had a good punch still to throw. With the panzershrek gone I would be waiting for the Sherman to move closer before a panzerfaust would be within a range worth trying a shot.

The Americans pushed the squad forward on the left flank and pulled in SL and final squad just behind from the advanced JOP. The new squad threw smoke and the put down some covering fire. The move brought them just past the 90 arc for the MMG which forced me to move them into the house to get cover and reorient the LMG.

Lots more fives for Mike and any spare dice went to beating up the IG 18, which was eventually forced to break. I brought on my second full squad and final unit into the upstairs of the central house and spent a phase hammering into the overstretched squad with every possible unit. I managed to pin them but that was it. with most of the squad alive I would need another 9 points of shock or similar to get them to break.

The US used the fresh squad to start to flank round the house down the road, towards an unprotected JOP in the "grey box" zone. They also hammered the Lone LMG team on the US right flank  which was beaten down to one man with the JL and SL.

At this point I decided to withdraw. That group of two leaders and a LMG was too fragile and too much of a target to survive much longer. My strong point in the central house would have been able to do some serious damage to the US squads eventually although not without some losses themselves. I was 2 points higher in FM thanks to some injuries on his JLs and had 5 casualties from the platoon. With three more maps to play I think I've already taken too many losses to be hanging around much longer.

So another two men lost permanently and one missing the next game, ends up with 7 men missing the next game, so I'll probably need to consider some reinforcements.

Well played to Mike who is getting to grips with Chain of Command and trying to get his Yanks moving forward despite pitifully low movement rolls! We noted that if we played more frequently the game would flow a lot better with less requirement to refer to the rules.